Creating a button that interacts with a modal to fetch selected data involves a few steps. First, initiate the button within your HTML structure, assigning it a unique identifier or class for JavaScript interaction. Ensure the button is programmed to trigger the modal display upon clicking.
Next, populate the modal with a list of data items, each with its own selectable attribute, such as a checkbox or click event listener. JavaScript can facilitate this interaction by capturing the user's selection upon the modal's visibility.
Once the user selects specific items from the displayed list, capture this data using JavaScript, potentially using event listeners or specific functions tied to the modal's elements. The selected data can be stored in variables or an array for further processing or display.
To summarize, the process involves HTML markup for the button and modal, JavaScript for triggering the modal and capturing selected data, and potentially data storage mechanisms like variables or arrays. This interaction enables users to interact with a list displayed in a modal and retrieve the selected data through the button interaction.
First, please review the following post to refresh your memory on how to create a button and open a modal
https://vanhiep.net/new/magento-how-to-create-a-modal-that-opens-when-clicking-a-button-and-simultaneously-calls-a-data-list-within-the-modal.html
In the directory Module/Vendor/view/adminhtml/ui_component, open the file named banner_form.xml

At the modal tag, we declare an attribute named 'component' with a path leading to the modal-component file as shown in the image above

In the directory Vendor/Module/view/adminhtml/web/js/modal, we create a file named modal-component.js with content as shown in the image above.In this file, we declare a function named customAction. This function must have the same name as the function declared in the file banner_form.xml
In the above example, please adjust the 'select' array to match, as my modal is declared in the banner_form.xml file. Therefore, my selector should be modified as follows
var arr = $('.banner_form_banner_form_fieldset_group_insert_listing_example_modal table tbody input[type="checkbox"]:checked');

Please review the previous post carefully to learn how to display a data list in the modal

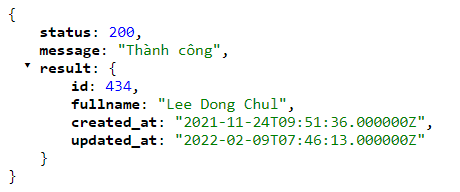
When the user clicks the button, we'll handle the customAction function declared in the modal-component.js file. Here, we'll retrieve the checked rows as shown in the image, simultaneously logging the data to verify if we've successfully retrieved the data

After selecting 3 records and clicking the button, we've obtained the IDs of those 3 records. In this post, we've successfully retrieved data from the data list in the modal. In the next post, we'll explore how to process this data for display in the banner_form.xml form before saving it into the database


![[SSH] - Configuring SSH on MacBook](/upload/img/news/ssh-la-gi-4.jpeg)
![[Magento] - How to create a button and retrieve selected data from the list displayed in the modal](/upload/img/news/magento-217.png)
![[Magento] - How to create a modal that opens when clicking a button and simultaneously calls a data list within the modal.](/upload/img/news/magento-2.png)
![[Macbook] - How to disable live captions](/upload/images/Screenshot%202023-10-23%20at%2020_34_57.png)
![[Magento] - Cách viết css bằng file scss và chèn css vào magento](/upload/img/news/magento-29.png)
![[Magento] - cách lập trình 1 theme trong magento](/upload/img/news/magento-211.png)
![[Magento] - cách tạo module trong magento](/upload/img/news/magento-212.png)

.jpg)